OT2Go->Spine User Guide
| Table of Contents | |
|---|---|
| Overview | basic terminology and how things work |
| App Tabs | description of top level tab options |
| App Menus | description of top level menu options |
| Premium Features | enhancements to app functionality |
| Getting Started | how to setup a user configuration |
| Find Match | find the perfect arrow |
| Quick Change | modify commonly changed items |
| Filters | narrow search parameters |
| User Records | maintaining user records |
| Configure Bow | modify the bow component |
| Configure Arrow | modify the arrow component |
| Configure WOS | modify weight on string component |
| Store | premium feature purchase and restore |
| About | app and database information |
| Stickbow Setup Tips | configuring non-compound bows |
| Spine 101 | random thoughts regarding spine |
Overview
What follows is an explanation of the terminology and language used to describe OnTarget2Go! Spine (OT2Go->Spine) app functionality. The item in bold is the name of the feature or convention, and the explaination or definition following.
Screen: the entire, currently visible, work area of the application.
Navbar: a single row at the Screen top edge when the user has clicked to the Config, Store, or About screens. A back arrow is displayed at the left edge of the Navbar. The back arrow goes back one level of displayable screens.
Toolbar: a row of icons at the lower edge of the app screen that have menu functionality exposed for quick, single click access. The Toolbar also contains the currently loaded user record.
Tab Buttons: along the top edge of the Screen. Clicking a Tab Button loads the associated view and work area. Tab options are Find Match, Quick Change, and Filters.
View: the work area of a screen that contains multiple input fields. A title and description of the input is on the left and the data entry field is on the right. A view can be "flickable". If the view has a green bar at its lower edge, that means more to display or that the view can be "flicked". If the view has been flicked and has reached the last displayable field, a red bar appears.
Check Boxes: app options, of which one or more, none, or all may be "selected"; the check boxes are small boxes, when selected they have a"check mark" in them. If a check box is associated with edit fields, then, when checked, the fields unlock. Unchecking locks the edit fields. Lockable edit fields have a red border when locked and a green border when input or changes are allowed.
Edit Field: the area of a view that allows data entry and changes in the form of numbers or letters. A title and description of the input is on the left and the data entry field is on the right. If the user enter a value out of range of the field, the app will display the min or max of the input field. An edit field has a white background.
Button: a control that causes the app to execute some function or operation. They usually have a descriptive wording or symbol on their face to denote their function.
Calculation Field: a field about the size of an edit field, but light blue in color; the color makes the field easily discernable from other field types. Light blue means that the app does a calculation or loads data for you. You may not edit a calculation field.
Spinner: a group of two buttons, one with an "up arrow" and one with a "down arrow" on their face. They are usually located next to an edit field and, when clicked, change the edit field value a predetermined amount up or down. Spinners do not allow manual editing of the value they contain.
ComboBox(or ListBox): looks like a button with a text description or a Navbar with a right arrow. Clicking on the ComboBox allows selection of an item contained in a drop down or list.
Dynamic Spine Dial: a circular, colored control showing setup dynamic spine relative to the currently selected shaft brand/model. The output is in the from of weaker, optimal, and stiffer. The pointer does not need to be dead center "green". If the pointer is between plus or minus two major tic marks, a shaft is generally "tune-able".
Data Sheet: a chart or grid that displays associated app values, data, or records.
Scroll Bar: attached to the rightside (or bottom) of a data sheet; It has a drag handle (if the OS has that feature), and that will cause the attached data sheet to scroll or expose new data.
Dialog and Message Box: something the app loads and displays as a result of user input or a app error.
Premium Features: options that may be purchased to enhance app function.
App Tabs
The main screen has three options: Find Match, Quick Change, and Filters. The options are located at the top of the screen.
Find Match This main view contains options and results related to searching for the best shaft choice based on the user configuration currently loaded.
Quick Change This main view contains commonly changed setup items that are modified with spinner controls. The effects of the changes are shown as they are made on the dynamic spine dial.
Filters This main view contains search filters that are used to narrow or refine the output of shaft searches on the Find Match work area. Filtering can be done by Weight, Diameter, and FOC Ranges; whether
or not a shaft model is current or discontinued; Shaft Usage; Shaft Material; or from a manufacturer checklist.
Getting Started
Pretty simple really. Visit the various manufacturer websites to find your equipment information. Select the Config button in the Toolbar. Then select Config Bow, Config Arrow, and Config WOS; entering your data into each view. Once you've gotten to the point that you would not want to re-type or start over, save your information in a user record. Select Config on the toolbar, then select User Record from the list. Name the user record something that is recognizable but not so specific that changing a component invalidates the name. Your saved user record can now be restored any time you need it. You're now ready to visit the other views and start playing the various program features. Click a tab button to visit Find Match, Quick Change, or Filters and you'll have a new program view. NOTE: saving a user record is a Premium Feature.
Possibly the two most important measurements you'll need to record for the purposes of making sight tapes are Peep Height and Sight Radius. (See the discussion on how these measurements are taken in the Sight Spec section below) Peep Height and Sight Radius measurements are key to obtaining good results when making sight tapes or charts. They should be as accurate as you are capable of measuring. Using a dial caliper or other ultra accurate measuring device is a good idea. Peep Height is measured from the centerline of the peep to the centerline of the arrow shaft. Sight Radius is measured from the center line of the peep to the plane of the scope lense or pin(s). Both measurements must be taken while at full draw.
An accurate draw length is required for calculating arrow spine requirements. There are two methods of measuring draw length. True Draw Length is measured from the low point of the grip to the nock groove while at full draw. The low point of the grip is usually in line with the rest attachment hole in the riser. AMO Draw Length is True DrawLength plus 1.75 inches. Manufacturers label bows and cams with the AMO draw length measurement. It is a good idea to actually check your bow's draw length to make sure that the draw length stated by the manufacturer or listed on the cam is accurate. All Pinwheel Software programs use only AMO Draw Length. Some companies consider plus or minus a half an inch for a draw length measurement to be OK, while other manufacturers are spot on. This is mentioned only because a half inch difference between stated and actual AMO draw length will make a difference in both calculated velocities and shaft recommendations the program makes.
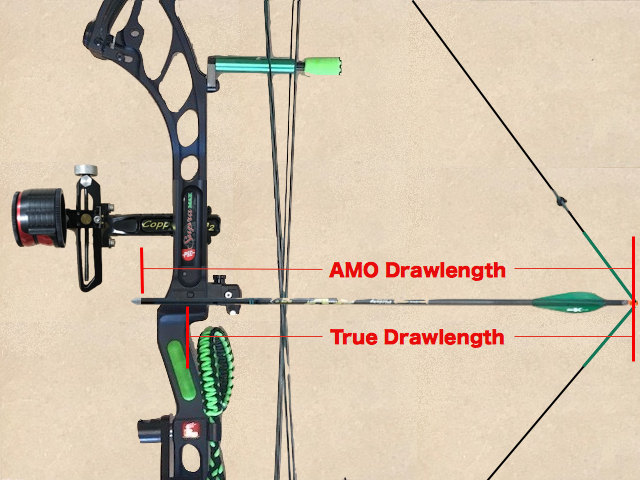
How To Measure
Draw Length
The program will do a good job of estimating the velocity generated by your setup..IF you provide accurate data.
When entering or modifying data in the edit fields, you might run into the situation that you enter some value and find that the program sets it to something else. This is the program's data validation at work. Each edit field is range checked to insure that you are not entering something that will cause a program error. If you run across a field that you don't think you'll need, leave it at the default setting. Every effort has been made to make the program as bullet-proof as possible in regards to data errors, but don't go zeroing out a field (or inserting " "s) just because you think you don't need it. Once you make all your initial selections and changes, save your user record.
Find Match View
This main view contains options and results related to searching for the best shaft choice based on the user configuration currently loaded. The selected shaft brand and model are displayed in combo boxes above the shaft data display.
The user selects a shaft from the database for evaluation using one of two methods. The first method is to use the combo boxes to select the brand, model, and shaft size. The combo boxes are above the shaft data display. The alternate method is to set the filters to use and then click the New Search button; resulting in the datasheet being populated with shaft option matching ther filters in use.
Selecting the shaft brand or model allows the user to make changes to either. Clicking or tapping a combo box, slides to the selection view where the user can view the list of available choices. The selection lists are flickable.
Click or tap the New Search button to initiate a database search and let the app find a selection of potential matches. After the search results have been compiled, the resulting matches are displayed in a scrollable or flickable data sheet. If the user sees a "match" they want to explore further, they tap or click the row in the data sheet. The selected shaft is loaded and it is hi-lighted in the list.
NOTE: making a new selection from the data sheet over-rides various shaft input fields and causes a general recalculation of all shaft datapoints..FPS, TAW, GR/LB, KE, MO, and %FOC. This replaces data contained in the displayed user configuration allowing for "what-if" comparisons.
Shaft information from the database pertaining to a specific shaft insert or bushing/pin weight are incorporated into the arrow config when a new selection is made. Changing the values make sense, especially when a different shaft has been selected, as most shafts use unique components of varying weights.
Interpreting the Dynamic Spine Dial is done with the knowledge that its output is customizable by the user. The program default settings represent acceptable industry standards. The two tic marks that represent the green area of the spine evaluator suggest the "best recommendation" for your setup based on the criteria and settings the user has selected. This does not mean that a result outside the green will not tune or shoot well. Your shooting style, bow hand torque, and cam lean are things that will have an effect on the spine your bow will shoot accurately, but are not things the program can take into account. One to two tics from dead center green is usually a "tune-able" result. From a practical standpoint, one to two tics marks (0.0125 to 0.0250 inspine) might represent a 4lbs adjustment in draw weight, or a 2lb draw weight adjustment combined with a 25gr point weight shift, or a 25 gr point weight adjustment combined with a 1" adjustment in shaft length.
Data in the saved user records remains unaffected unless the current configuration is saved. To restore the original user record data, just do a load user record.
Quick Change View
NOTE: accessing the Quick Change tab is a Premium Feature.
The Quick Change view is a convenience feature. The user can change aspects of their configuration pertaining to both the bow and arrow config on the same view.
The spinner controls attached to each edit field allow simple up down changes to the field values. No direct editing is allowed; the up/down arrows must be used. Each time the view is entered, the spinner values are loaded from the data held in the bow and arrow config screens.
Bow configuration changes are draw weight and percent letoff.
Arrow configuration changes are point weight, insert weight, shaft length, and fletch weight.
When spinner changes are made, the dynamic spine dial updates as the changes occur.
Filters View
NOTE: accessing the Filters tab is a Premium Feature.
Using Search Filters for finding a correctly spined shaft that meets a specific set of requirements is accomplished by utilizing a unique set of filtering mechanisms to refine the search and help the user locate exactly what they're looking for. The user can expand or reduce the range of interest by selecting and setting the filters located in the Search Filters frame.
By enabling a filter with a combo box or check box, the user can find matching shafts to fit their needs. Searches by shaft manufacturer or company are by All Manufacturers, Selected Brand Only (a specific manufacturer), or From A Checked List (user determined list of mfgs). Further filtering is accomplished by Shaft Usage (target, hunting, or target&hunting), Shaft Composition (aluminum, carbon, composite(aluminum/carbon)), Shaft Weight range, Shaft Diameter range, or finished arrow FOC range; or any combination of these options.
Additionally, the user can choose to omit shaft models that are no longer manufactured by checking the No Discontinued shafts check box. The more filters that are enabled, the more refined the search becomes. If a search returns few or no matches, the range or filters employed in the search may need to be modified or expanded.
Spine Sensitivity Range is the span covered by the graphic spine evaluator and is determined by the Sensitivity value found in the Search Filter frame. The Sensitivity value defaults to 0.025 and determines the calculated width of the green "good" area of the graphic spine evaluator.
The value of each tic mark is defined as one half of the Sensitivity value in use. The tic mark default is therefore 0.0125. If you change the Sensitivity value, the app adjusts the tic mark value accordingly. A smaller number entered for the Sensitivity value shrinks the calculated width of the evaluator's green center section and surrounding tic marks and a larger one expands them. This is not to say that the physical(visual) size of the graphic changes, more that a given spine change will appear less dramatic with a large sensitivity value than with a small one. The Sensitivity range value is used to determine just how close a shaft has to match the setup requirements before it's considered "matching". The value is entered as a positive number (no sign + or -) and the program uses this value during its match evaluations. At the app default settings, the twelve tic mark range covered by the spine evaluator represents a total span of 0.150 in dynamic spine. Six tics to the right of center green is 0.075 "stiff" and six tics to the left is 0.075 "weak".
If the user discovers that the Find Match results do not reflect their real-world tuning experience, they can modify the app spine selection algorithm by using the Synch edit field. This creates an adjustment factor used in the selection process, thus over-riding the standard settings until it is reset. Think of it as a way of telling the program that your experience or personal testing trumps the program results. To enable the synch mechanism, load the bow you're working with. Click or tap to the Filters tab. Make sure the arrow shaft you plan to synch to is loaded. Modify the Synch edit fiel value to bring the optimal spine into your acceptable range. This will tell the program your current setup is the "gold standard" for searching the database and making spine comparisons. Generally, new users should be wary of using it, as it can have a very dramatic effect on results if you make adjustments to it and don't realize the synch value is non-zero. You should remember to re-zero when you're finished using it. Do not use the Synch feature unless you intend to alter the spine match algorithm.
User Records View
NOTE: saving a user record is a Premium Feature.
The User Record view allows for basic file load, save, and delete functions. Renaminig to be added in a future release. The user records are maintained in the device local storage, so they are not a restorable item.
This was mentioned in the Getting Started section, but bears repeating. Once you've gotten to the point in creating a configuration where you would not want to re-type or start over with the data entry process, save your information in a user record.
There are three buttons on this view: Load UR, Save UR, and Delete UR. Their function should be self explanatory. The Load UR button loads a saved user record. The Save UR button saves the current configuration in the app. The Delete UR button permanently removes the selected user record from device storage.
When you purchase a "save", you can load and save over the record as many times as you like. Deleting a saved user record deletes the physical record from the device. When you delete a record, the save count is not incremented. It
does not add back a "save" to the available save count when you delete.
The only time the saved records disappear is when you delete them, when you do an uninstall of the app, or when you wipe your device and switch to a new phone/device. The user record data resides in the device storage..not on
the servers maintained at Google or Apple..so once deleted they're gone. Deleted user records can't be restored with the Restore button because they are considered "consumable" in-app purchases..like a game
"power-up".
Config Bow View
This view allows the user to configure their bow. Everything you need to know about your bow should be available from the manufacturer website. The IBO rating is critical for doing the spine calculations.
The physical bow dimensions, Axle To Axle and Brace Height, while usually published on the manufacturer website, should be verified with a tape measure. For non-compound bows, instead of axle-to-axle, you use the AMO bow length. Most traditional bows will be labeled around the grip area with the AMO length.
Measure the actual draw weight of your bow. You'll need a draw weight scale for this, so if you do not have one, you'll need to take a trip to you local pro shop. You cannot assume that bottoming the limbs will result in the stated max draw weight. Most bows actually max out at 3-4 pounds above the stated max draw weight.
When you measure the draw weight, you should also take note of the percent letoff. Percent Letoff is the difference between the Draw Weight and the bow's holding weight. Both draw weight and percent letoff can be affected by strings or cable that are not to "manufacturer specs".
Measuring draw length was discussed in the Getting Started section, but just to reiterate, the app uses AMO draw length.
When changing to new string or cables, it's not uncommon to see differences in all the measured bow specs. So, be aware of this fact and double check your measurements when you replace string or cables.
Config Arrow View
This view allows the user to configure their arrow. The importance of data entered here is multi-faceted; it helps to define a drag model for use in trajectory calculations and in making sight tapes, as well as calculating everything arrow related: KE, MO, GPI, FOC, velocity, and dynamic spine.
NOTE: Don't forget this is a flickable view.
Shaft Length is the measured length of the shaft material only. Shaft Length is the measured length of the shaft material only. Shaft Length is the measured length of the shaft material only. That was not a misprint..it was repeated because of its importance. Do not confuse shaft length with AMO arrow length. AMO arrow length is not used by Pinwheel Software products. If you do use AMO complete arrow length in place of shaft length, you will cause the program to make incorrect calculations. Inputting the incorrect shaft material length will result in errors in the total arrow weight calculated, the FOC calculated, the velocity calculated, the KE calculated, the momentum calculated, and most importantly, the spine requirements for your setup.
The weight of shafts in grains per inch comes from the shaft database when a shaft is selected. Weights listed in the database are from manufacturers published specs. The specifications may change between model years or, in some cases, from batch to batch as shafts are manufactured. Some manufacturers label the shafts or packaging with letter sequences or weight ranges. This is done so you can re-order the same weight sequence.
The Shaft GPI edit field may be changed to reflect the actual shaft weight in grains per inch versus what is published. If the app calculated total arrow weight (TAW) is off by more than three to five grains from what has been measured with a grain scale, this would be a logical first place to look to determine the cause. Check manufacturer websites for current weight information.
Manufacturers provide nock and fletching data on their websites. Another good source of this info is catalogs like the one from Lancaster Archery Supply. The data is generally accurate, but variations in production runs can cause differences in weights. Usually the variation between runs is less than 1 grain. Color can also influence the weight of nocks and vanes, but usually only minor amounts (~0.1-0.2 grains). The larger the vane the more the color will affect the weight.
For Arrow Wrap weights, it's best to visit a manufacturer website or e-mail/call them. The weight really depends on the wrap size in square inches. Not to be confused with a per inch weight. Wraps come in multiple widths and lengths. Different widths support different shaft ODs; a 27xx uses a wider wrap than a 19xx shaft. One website lists normal wraps as ~1.1grs per sq/in, reflective wraps as ~1.6grs per sq/in. Colored Ink makes a wrap heavier. A solid color will probably weigh more than a wrap with a design or picture.
If you use an adjustable point weight system, like those offered by PDP, Gold Tip, Easton, Black Eagle, or TopHat, add the additional weight to the Point Insert Weight field.
Fletch Offset is a key component in calculating the drag of a complete arrow. A default setting of 2.0 is considered normal. For helical, this value may be increased toward the max value of 5.0, as required. The value can have a significant effect on sight marks, especially at longer ranges. Changes to this field can be made if there is a noticeable variance in mid-range marks. If mid-range marks are "hot", increase this value to correct. When calculating a velocity from sight marks or pin gaps on the Config Sight view, increasing the offset value will raise the calculated velocity, while decreasing it will have the opposite effect.
Config WOS View
This view allows the user to configure the items that make up the Weight On String. You will need a grain scale to make the measurements exact.
Peep sights will vary in weight depending on the material used and whether or not the peep contains screw-in clarifier or verifyer lenses. Fletcher peeps will typically weight around 8 grains; peep made from magnesium will weigh around 5 grains; peeps like those from SAP with a verifier/clarifier system can weigh 20 to 25 grains.
Peep Sight Weights
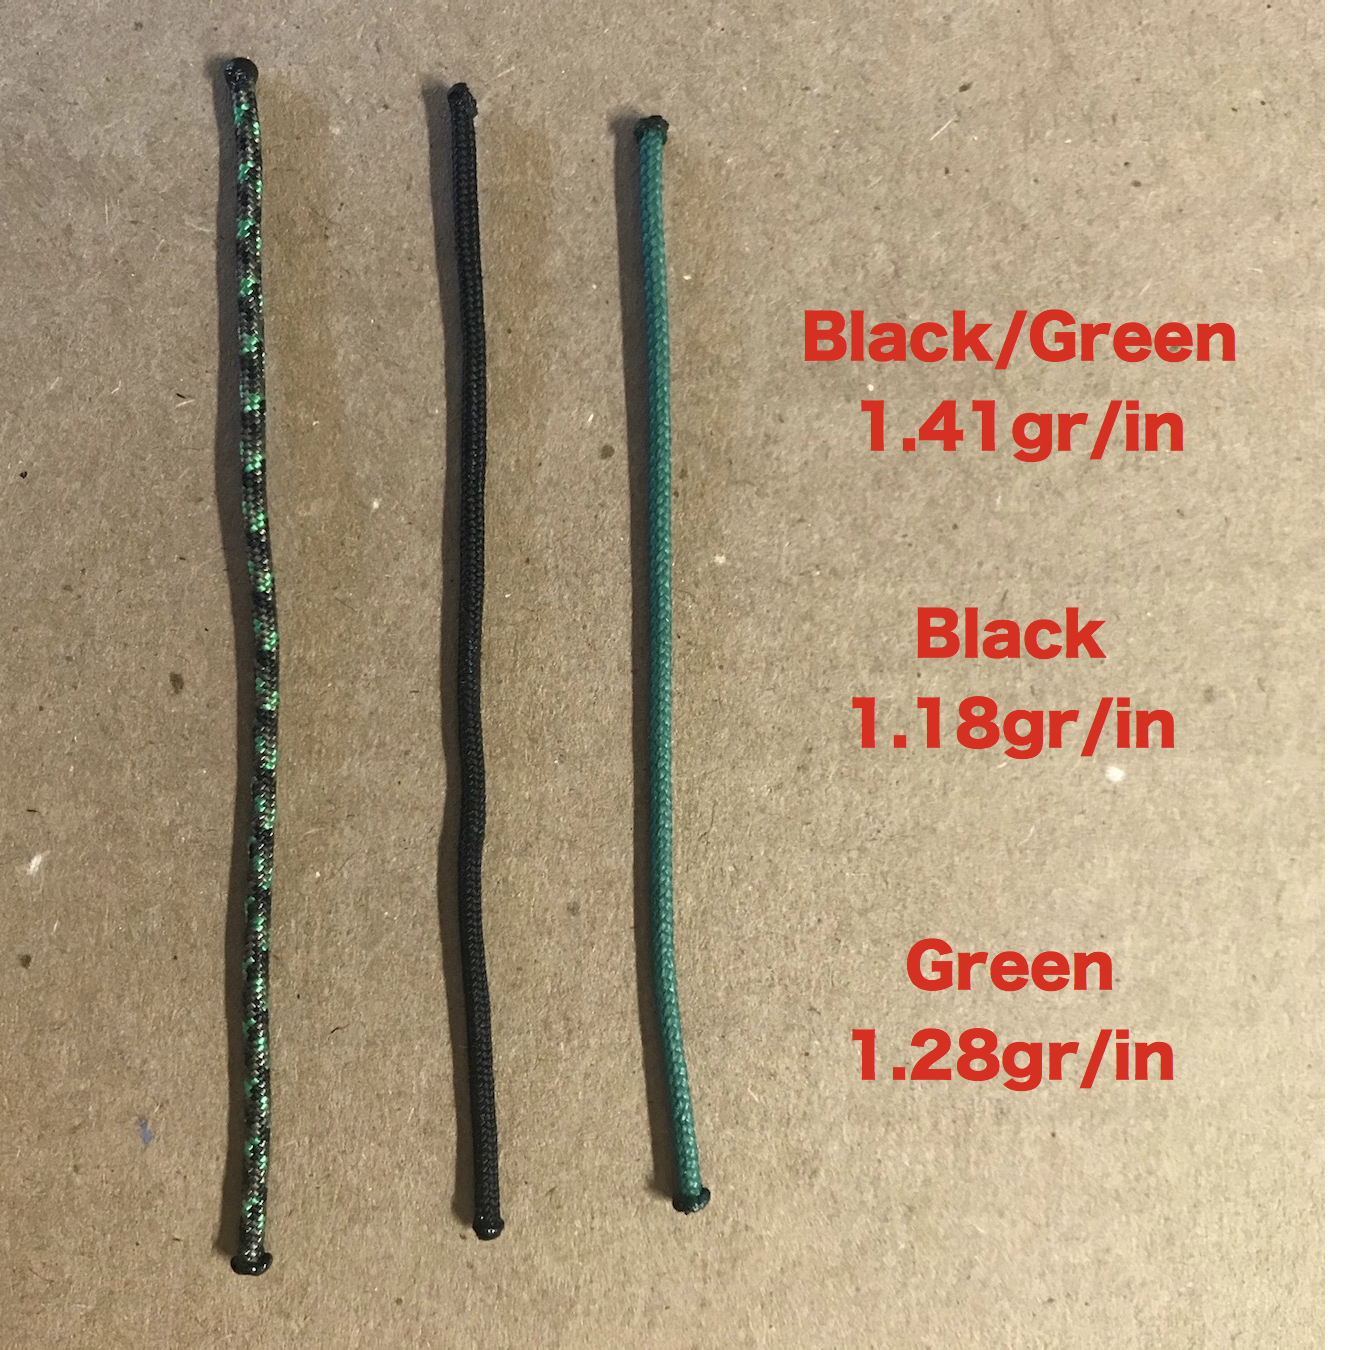
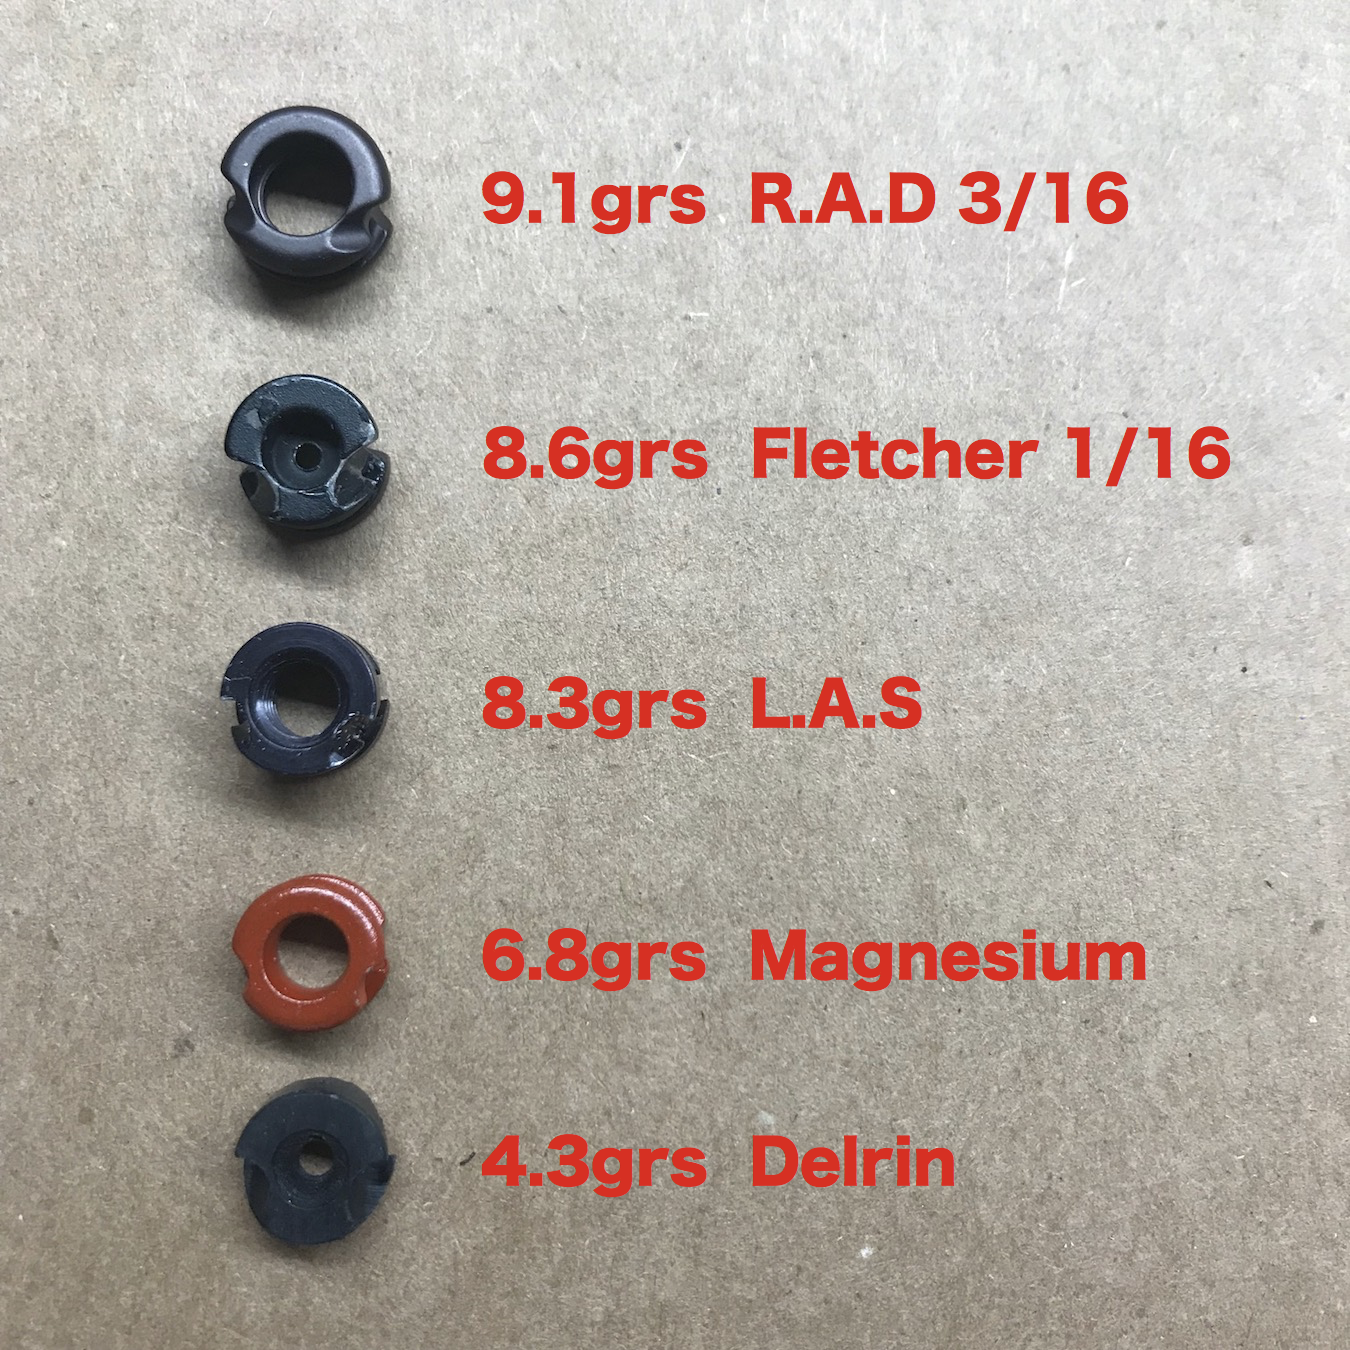
D-Loop Weights
D-loop material varies based on thickness and composition. Obviously best to weigh yours, but you can estimate.
There are two sizes of brass nock sets; the smaller weighs 5 grains and the larger weighs 7 grains. Tied-on nocks vary in weight based on the quantity (number to wraps around string) and thickness of the material used; 2 to 4 grains is normal.
There are so many different string silencers that you'll just need to weigh them or trust the manufacturer's stated weight.
Silencer DFC is the only WOS item that is not weight related. DFC stands for Distance From Cam. So use your tape measure and take the measurement from where the string leaves the cam to the center of the silencer. This measurement is taken with the bow at rest; IE not drawn.
Store View
The button to enter the app view for purchasing Premium Features is in the lower right corner in the toolbar and looks like a shopping basket. When there is something available for purchase it's visible.
In order to make a purchase, select the item from the purchase option list by clicking or tapping. When the Purchase button is high-lighted and activated, click or tap the button to complete the purchase.
If you uninstall the app, reset your device, or switch to a new device, you can click or tap the Restore button. The non consumable purchases will be restored.
NOTE: when you restore purchases, user record saves are not restored.
About View
The button to enter the app About view is in the lower right corner in the toolbar and looks like a circle containing an "i". This view contains info for contacting Pinwheel Software, shaft database status, and premium features try-it status.
Contact info is in the form of an e-mail address. The Pinwheel website also has contact forms, e-mail, and telephone number info.
The status field displaying shaft database info contains the database year and the database release number. Multiple databases are released each calendar year. The year and release number are in the form of 20xx-nn. 20xx represents the year of database access (premium feature) and nn represents the release iteration. If no database access has been purchased, Placeholder will be displayed.
The area displaying Try-It status shows try-it counts for each premium feature. Each try-it has a usage count associated with it. As you try the feature, a counter is decremented. This allows the user to try a feature before buying. When a premium feature has been purchased, this is also indicated.
Stickbow Setup Tips
For non-compound bows, instead of axle-to-axle, you use the AMO bow length. Most traditional bows will be labeled around the grip area with the AMO length.
On the Database tab of the MySetup screen..bottom middle..there are 3 selection boxes. Recurve and Longbow types are in the top generic bow selection box, that by default displays "Compound". Make your recurve or longbow selection
based on the performance characteristic of your specific bow.
When you select from the list of bow types, an IBO estimate range for each performance model is displayed. The velocity range might be something like 230-260 and will be displayed in the Bows Frame.
The IBO is used as the program starting point for calculations. The IBO you enter is used is to help the program estimate a velocity. The IBO is also used to determine spine recommendations. You adjust IBO velocity on the Bow Specs tab.
If you have your setup built and input it's pretty easy to calibrate the program to a known velocity and back into the "real" IBO.
You will need to have a general idea of your recurve's IBO. This is not something that recurve maker publish, so you will need to back into the actual number for your setup. By "back into", it is meant you'll need to adjust the
IBO on the Bow Specs tab until it matches a known velocity for a given arrow configuration shot from your bow.
If you've chronographed or know the velocity of your bow/arrow combination by calculating it from marks, then you can just make changes to the IBO edit field until the program's calculated velocity equals your known velocity for the given
bow/arrow combination.
If you do not have a chronograph, shoot in 2 solid sight marks.30&50 or 30&60..are good. Avoid marks less than 20 as they are easy to fudge and be "close enough". 3-4clicks at 20yds just move you around the x-ring on a vegas
face. The 1st distance is the anchor for the program calculations, so if it's off the velocity calculated will also be off.
Click to the Sight Specs tab and let the program resolve a velocity for your 2 marks. The program uses your shot in marks..a range and the mark+click setting for that range. The way your sight is configured (peep height & sight
radius), and arrow configuration you've built (TAW and drag model) to calculate a velocity. Once you calculate, the velocity displays in the Velocity From Marks or Gaps selection box..then you can just make changes to the IBO
edit field until the program's calculated velocity equals your shot in marks velocity.
Spine 101
NOTE: Random Thoughts and Opinions on Spine.
Calculating a stiffer spine for hunting versus target application has been done to align with the historical nature of arrow spine charts. Calculating a "target" spine and a "hunting" spine offers the same functionality provided by the Easton shaft selection charts. Since 1992 (and probably earlier), there have been two Easton charts; one for target and one for hunting. A guess as to why there are two charts would be that broadheads were always much heavier than glue-in target points; usually 125gr or 145grs. While most glue-in NIBBs were less than 100grs.
Manufacturers (MFG) categorize their shafts as "hunting" or "target". The app uses the MFG's designation in the database to ID shafts. When you use the "Target" filter, only MFG classified target models are extracted from the database. The "Hunting" filter extracts shafts labeled for hunting. Selecting the "Target&Hunting" filter extracts all matching shafts regardless of classification. Camo shafts with tight straightness tolerances are considered as "Target&Hunting", so they will show up using any of the search filters. Camo shafts would be the prime example for a "hunting" shaft. Classifying shafts that have straightness tolerances worse than ~0.003 total runout are also considered "hunting". These "less straight" shafts are often inexpensive or "branded" for discount sales. It's also possible that there may be more static spine variation in these "less expensive" models.
If you don't like the idea of using a "Target" or "Hunting" spine filter like the Easton charts, you have the flexibility to use the "Target&Hunting" filter option that splits the difference between Target spine and Hunting spine. Should Target, Hunting or Target&Hunting not fit your needs or match your personal tuning experiences, you can always over-ride the app and tell it what "your best match" is with the "Synch" spinner value.
There are other practical reasons to shoot stiffer shafts for hunting, the main one being that slightly stiff arrows generally are easier to tune when used in conjunction with fixed blade broadheads (BH). The picture sequence below shows an exaggerated version of what happens as an arrow is launched.
When you shoot a weak arrow, it is not typically aligned perfectly with the center shot of the bow. Paper tuning to eliminate a left-tear (nock left, right handed release shooter) weak indication usually involves moving the rest in toward the riser. This corrects the paper tear, but misaligns the shaft with the true center shot. An underspined arrow is launched with the point of the arrow directionally right of center. Not much, but enough for the BH to catch air and begin planing. Once planing starts, the arrow continues to the right. This is why weak BH tipped arrows group right of the same fieldpoint (FP) tipped arrows.
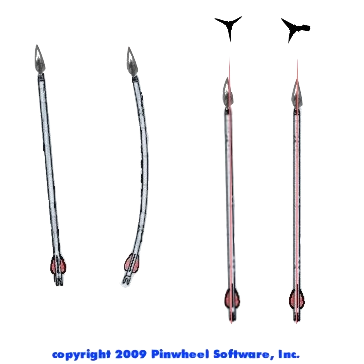
Stiff Arrow Reaction
point left of center shot
right-handed archers
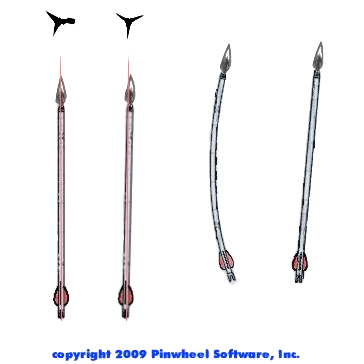
Weak Arrow Reaction
point right of center shot
right-handed archers
Conversely, for a stiff arrow response (nock right, right handed release shooter) indication, the rest must be moved away from the riser to eliminate a nock right condition. Again, this corrects the paper tear, but misaligns the shaft with the true center shot. They start out pointing left and plane left, grouping left of FP tipped arrows. FP tipped arrows do not plane as much and can, to some extent, correct themselves because they do not have steering wings at the tip.